Easy DIY Braided Yarn Hearts-Garland
- wendyasmann
- Jan 25, 2024
- 3 min read
Updated: Jan 29, 2024
Easy Valentine's Day craft for kids and adults- DIY Braided Yarn Hearts.

Lia Rose Simply Home is excited to share a budget-friendly Valentine's Day DIY – Braided Yarn Hearts! I enjoy DIY projects, especially when they're affordable or use materials I already have. Creating these adorable braided yarn hearts requires minimal supplies, and they are budget-friendly. The supplies for these braided hearts are simple – gather cardboard, hot glue, and some yarn. I purchased a roll of pink yarn from Walmart for less than three dollars. I'm thrilled with the results of these braided hearts, and the possibilities are endless for shapes you can create. I'm looking forward to crafting pumpkins and ghosts with my 8-year-old granddaughter for fall and Halloween this year. This is a great family activity to do with kids.
Typically, I don't decorate a lot for Valentine's Day, but this year, I decided to add some fun, festive touches to my granddaughter's play area. These DIY braided hearts were ideal for Valentine's Day. I made a few to hang individually and created a charming garland by taping a string of yarn to the back of each heart.

Shop this adorable wood tea set on Amazon here!
What You'll Need To Make Braided Yarn Hearts
Yarn
Cardboard box to cut your heart shapes
Hot glue gun and glue sticks
Scissors
I used a heart-shaped cookie cutter for a template
How To Make A Braided Yarn Heart Garland
STEP 1. Create a heart template by tracing it on cardboard and cutting it out. A heart-shaped cookie cutter works well as a template, or you can find clip art images online or draw one if needed.

The length of yarn you will need per heart depends on the size of the hearts your going to make. The hearts posted here are about 5 inches wide and I used 50-inch strands of yarn.
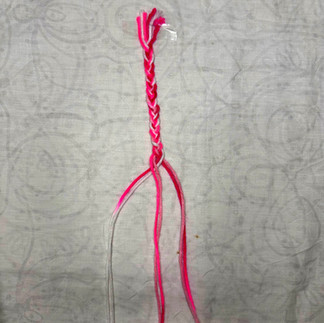
STEP 2. Cut six strands of yarn. I wanted a thicker braid with more texture so I braided six instead of braiding with three strands of yarn. Braid the yarn.
TIP Tie a small piece of yarn around the end, leaving enough for a tassel, and tape the end to the table. This will make it easier to braid.

STEP 3. Start by hot gluing the braid at the bottom point of the heart, beginning from the outer edge and progressing inward until the heart is filled. I left some yarn unbraided for a small tassel at the bottom.

STEP 4. Upon reaching the end, trim any excess yarn, and secure the end by tucking it in with a dab of hot glue.

You can customize these DIY braided hearts to your liking. If you're short on time like I was, you can opt to cover only the front of the cardboard the back of mine wasn't visible. However, you have the option to apply yarn to the back as well. Additionally, you can consider making a braid with three strands to apply to the outer shape of the heart as well to cover any visible cardboard.
Whether you're looking to add a touch of warmth to your home decor or create meaningful gifts for loved ones, these DIY braided yarn hearts are the perfect project for Valentine's Day.
Check out these simple DIY Sunflowers made with fabric scraps. Step-by-step instructions are here.

Subscribe to my email list and join me on this journey as we celebrate the joy of home, one delicious recipe and homemaking inspiration at a time.
Thank You for stopping by Lia Rose Simply Home, where you will find simple, inspirational, homemaking!


Comments